

Edit video
Mixture edits real footage right on the canvas. A screen recording, a camera cutout, and a voice track can all live in one composition and be trimmed, cut, and emphasised without ever leaving the editor.
Two places to edit
Section titled “Two places to edit”Editing footage in Mixture is split across two surfaces, and knowing which one you want saves a lot of hunting:
- The timeline is structure. Where a clip sits, how long it runs, and where it’s severed into separate pieces.
- The clip editor is content. What plays inside one piece — what’s cut out of it, where it punches in, how fast it runs.
Both are reached the same way, and the gesture is identical on video and audio clips — only the verbs the menu offers differ:
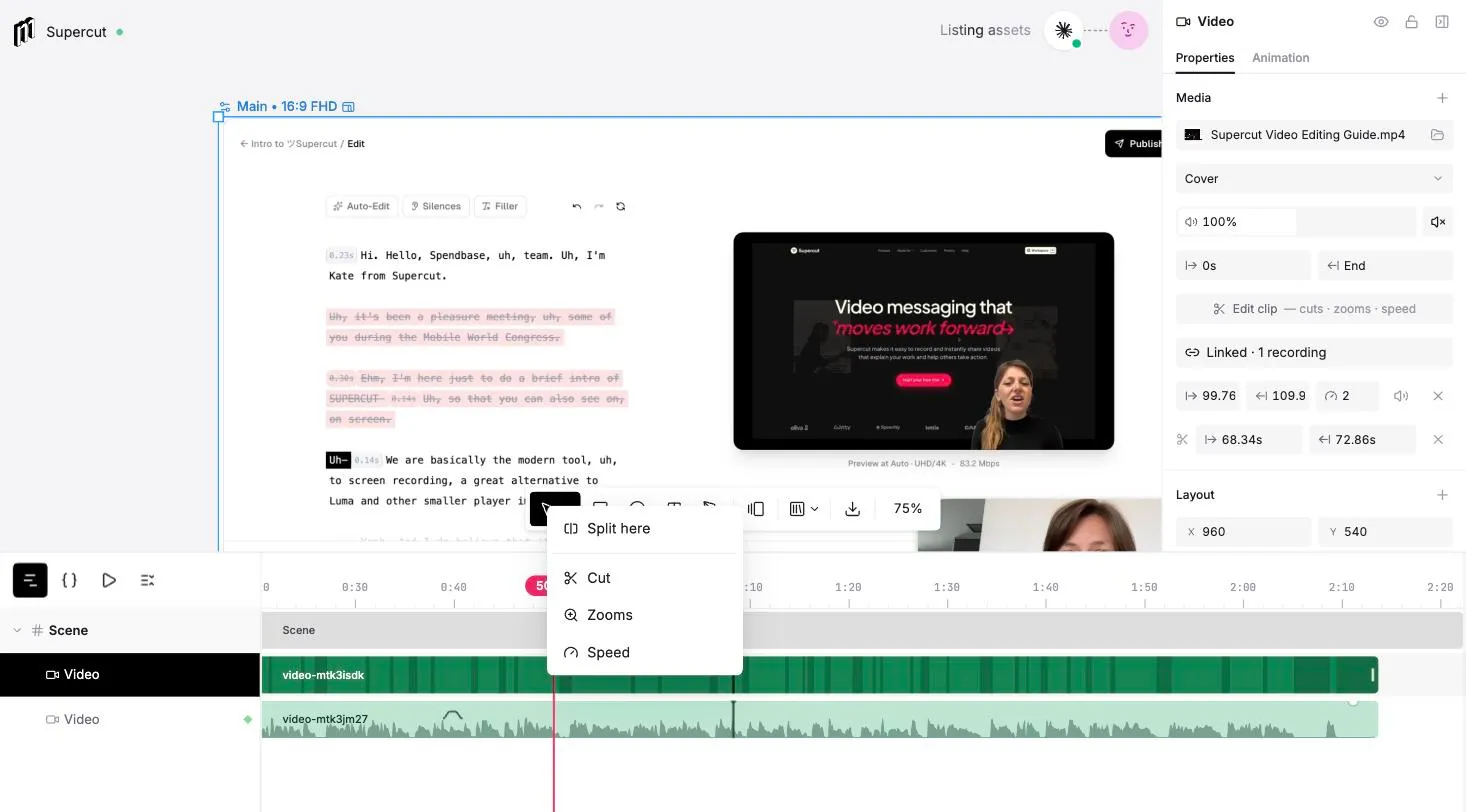
- Click a clip to select it — its bar highlights.
- Move along the selected clip. A slim time line follows your pointer down the bar — a mini-playhead showing exactly which moment you’re pointing at.
- Click again to open the menu, right where that time line sits — so whatever you pick acts at that moment.
Right-click does it in one step: it selects the clip (if it wasn’t already) and opens the menu at the click point immediately.
The menu adapts to the clip:
- On every clip — Split here (sever at that moment); Cut and Speed, which open the clip editor with that tool armed; and, on a clip you’ve already split, Join with next and Close gap to heal or pull a chunk back against its neighbour, plus Delete chunk to remove one piece.
- Video only — Zooms, to magnify part of the picture. A punch-in has no meaning for sound, so it’s absent on audio.
- Wherever there’s sound — Volume, and Duck under <clip>. That’s every audio clip, plus a video whose own audio is still live; a muted or silent video doesn’t show them.
Split a clip
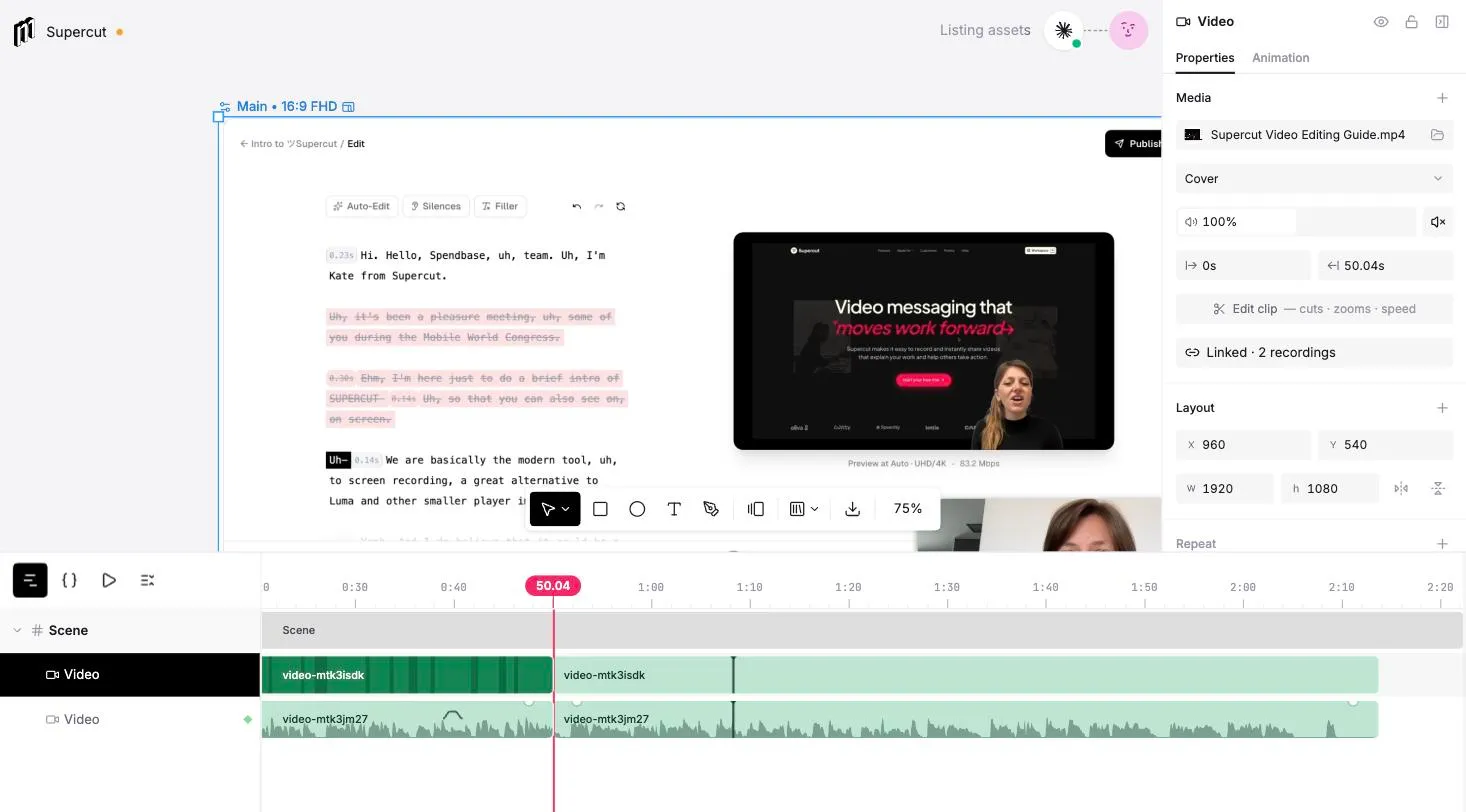
Section titled “Split a clip”Split here severs a clip into two independent chunks at that moment. Nothing about the picture changes — a split is frame-identical, purely a structural cut — but the two halves can now be moved, retimed, deleted, or separated independently.
The chunks stay visually grouped as one row on the timeline, so a much-divided clip doesn’t sprawl. Join with next heals a split back together; Close gap slides a chunk back against the one before it.
If the clip is linked to other angles, the split ripples across all of them at the same moment in the source, so every angle stays frame-locked.
The clip editor
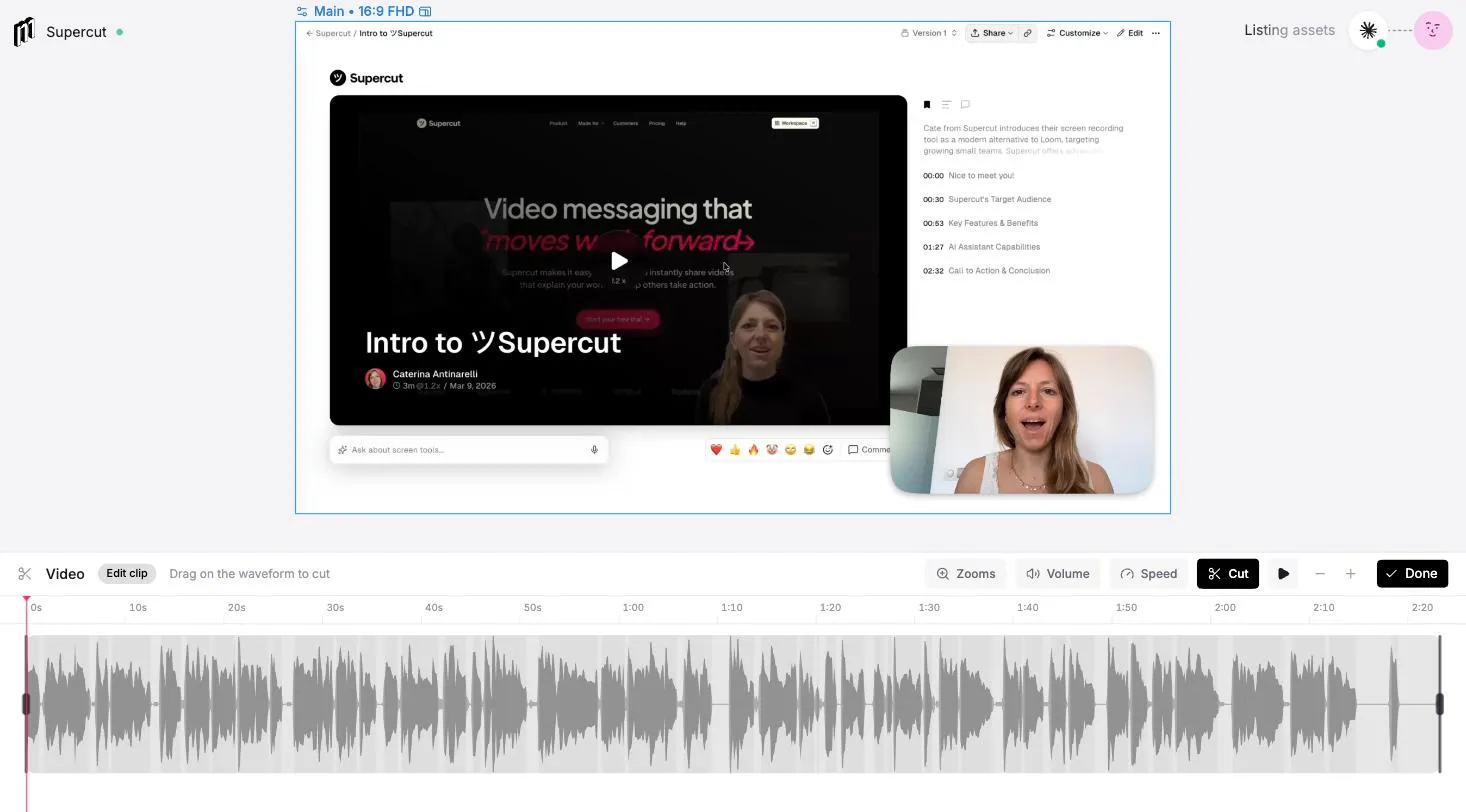
Section titled “The clip editor”Cut, Zooms, Speed or Volume open the clip editor: the clip’s full source with its audio waveform, and a header tracking how much you’ve trimmed (for example, “−90.0s in 12 cuts”). All four tools stay available once you’re in there — the menu item just decides which one is armed when it opens.
Remove sections with Cut
Section titled “Remove sections with Cut”Switch on the Cut tool and drag across the waveform to carve out the parts you don’t want. Removed material stays visible as red hatching, so a cut is never destructive — drag it back to restore the footage. The kept sections close up seamlessly on playback.
Trim and cut are the same idea in different places: the handles at either end of the source trim the head and tail, while a cut removes a span from the middle. Both are non-destructive.
Punch in with Zooms
Section titled “Punch in with Zooms”Switch on Zooms and draw a block on the zooms lane to magnify part of the frame — ideal for drawing attention to a detail on a screen recording. Place two blocks back to back and Mixture glides between them, panning from one focus point to the next.
Speed up and slow down
Section titled “Speed up and slow down”Switch on Speed and draw a block on the speed lane to play that span at a different rate — fast-forward a boring stretch at 4×, or drop a moment into slow motion at 0.5×. Select a block and a control chip appears above the editor: pick a Rate from the presets (0.25× up to 20×), drag the block to move it, drag its edges to resize, press Delete to remove it.
A sped-up span takes less time to play, so the clip shrinks on the timeline exactly as a cut would — and like a cut, nothing is destroyed. Remove the block and the span plays at normal speed again.
Cuts and speed blocks also show up as fields on the clip in the properties panel, so a range can be nudged by typing rather than dragging:
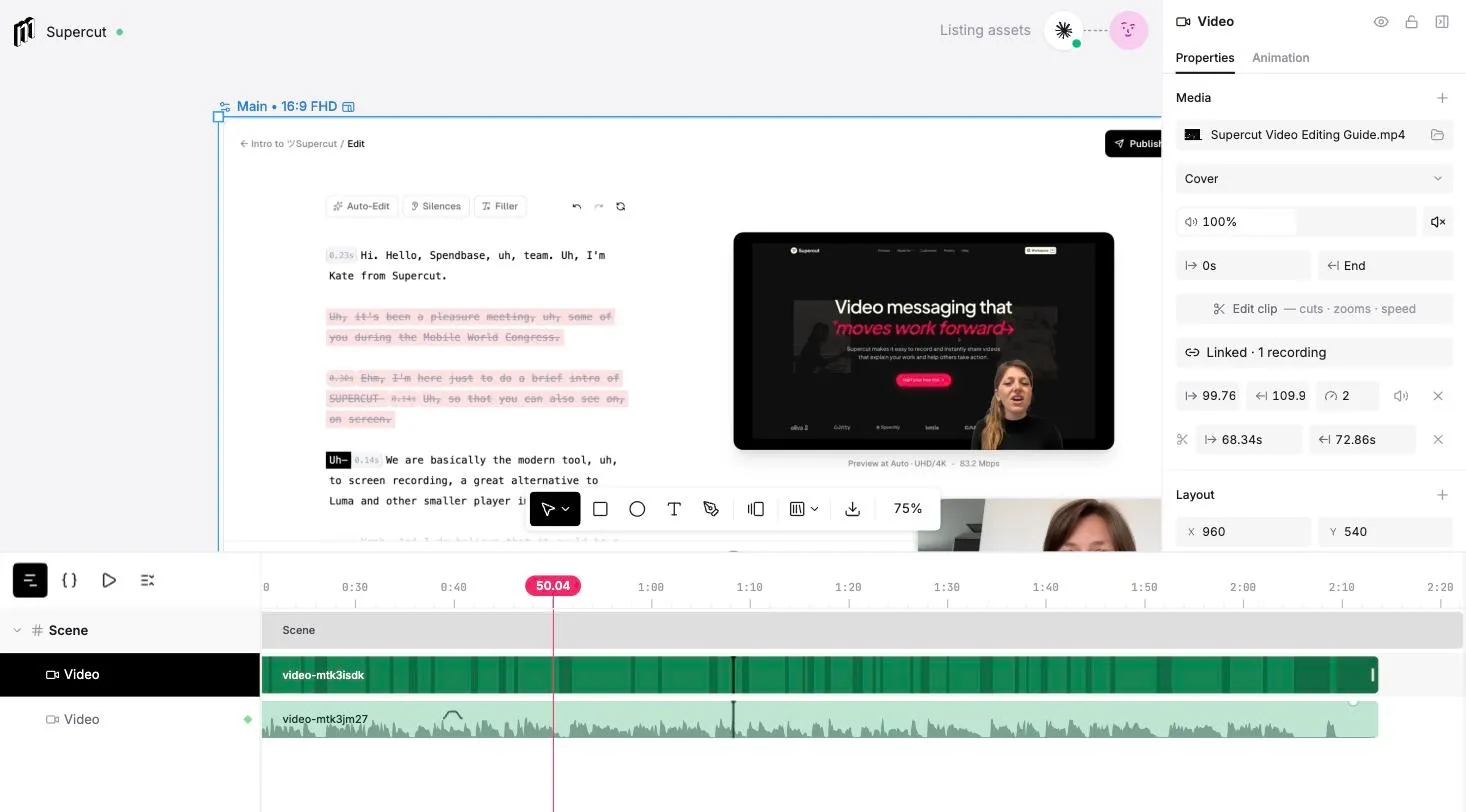
Sped-up speech is noise, not content, so each block also has a Mute toggle that silences the clip’s audio for exactly that span. On linked media the whole block travels with the link, mute included — a linked mic track goes quiet through the same stretch.
Shape the volume
Section titled “Shape the volume”Switch on Volume and the clip’s gain envelope draws over its waveform. Click the lane to add a point, drag across it to draw a fade, drag a point to move it in time and level, press Delete to remove one. The waveform itself redraws at the level you set, so a quiet passage looks quiet — and the same envelope appears, read-only, on the clip in the timeline, so you can see automation without opening anything.
The first point you add pins the clip’s two ends at their current level, so you’re shaping one moment rather than re-levelling the whole clip. Removing your points takes the clip back to its plain volume slider.
This works on music beds too. A track that spans the whole video — added at composition level rather than inside one scene — automates exactly the same way.
Fades and the envelope are different things
Section titled “Fades and the envelope are different things”A clip’s fade in and fade out are edge ramps, and they keep applying on top of whatever the envelope says: what you hear is the envelope multiplied by the fade. So a bed you’ve ducked to a quarter still rises from silence at the start — up to that quarter, not to full.
Setting a fade. Hover an audio clip in the timeline and a small tab appears at each top corner — drag it inward, and the shaded triangle shows the ramp. The same tabs sit on the Volume lane in the clip editor. Either way you’re setting the same two values, and the properties panel’s Fades fields still work if you want to type an exact number.
Fades vs points. A clip has exactly one fade in and one fade out, so they can only ever top and tail it. For a fade anywhere else — dipping under a sound effect, riding a quiet passage up, silencing a cough without cutting, easing between two halves of a music track — drag across the Volume lane and you get a ramp wherever you drew it, as many as you like. That’s the division: edges with the fades, everything inside with points.
When a fade is biting, the envelope you’re editing goes dashed and the solid line beneath it is what actually plays. Adding points at the very edge as well as a fade just fades twice.
Audio effects
Section titled “Audio effects”Add them from the + on a clip’s Audio section — or a video’s Media section, since a video’s own sound counts too. Each one becomes a row with a summary of its settings, an eye to bypass it, and a ⚙ that opens its controls beside the panel. They apply top to bottom.
The menu has two groups. Filters & EQ — high-pass, low-pass, low shelf, high shelf, notch, and a 5-band graphic EQ — and Effects: compressor, distortion, bitcrusher, reverb and flanger.
Everything in the first group is really one thing: an EQ holding a list of bands. Pick “High-pass filter” and you get an EQ with a high-pass band already set up, and the row says High-pass. Open its ⚙ and you can retune that band or add more to it — so shaping a voice with a high-pass and a presence boost is one effect with two bands, not two effects stacked.
The filters start somewhere you can clearly hear — a high-pass at 300Hz, say — so you know it’s working. For real voice cleanup you’ll want to pull that down to 80–100Hz, where it removes rumble without thinning the voice.
The graphic EQ starts flat, like every graphic EQ does, so it genuinely does nothing until you move a band. Its row says “flat” so that isn’t a mystery.
For a talking head, the two that matter are a high-pass around 80–100Hz to lose rumble and a compressor at about −24dB and 4:1 to even out the level. A small boost near 3kHz makes speech clearer. Reverb starts at 25% wet on purpose — at full wet it’s unusable on speech.
Effects run before the volume envelope and the fades, so a compressor reacts to the clip’s own level rather than to a duck you’ve applied, and a fade takes the processed sound to silence rather than cutting off a reverb that’s still ringing.
Duck music under a voice
Section titled “Duck music under a voice”Right-click a music clip and pick Duck under <clip>. Mixture reads the other clip’s waveform, works out where somebody is actually talking, and writes the volume envelope for you: down before each phrase, back up in the gaps, staying down through pauses too short to be worth lifting for.
What you get is ordinary volume points, not a locked effect — so if it clips one word too tightly, drag that point. Everything on the Volume lane is editable afterwards.
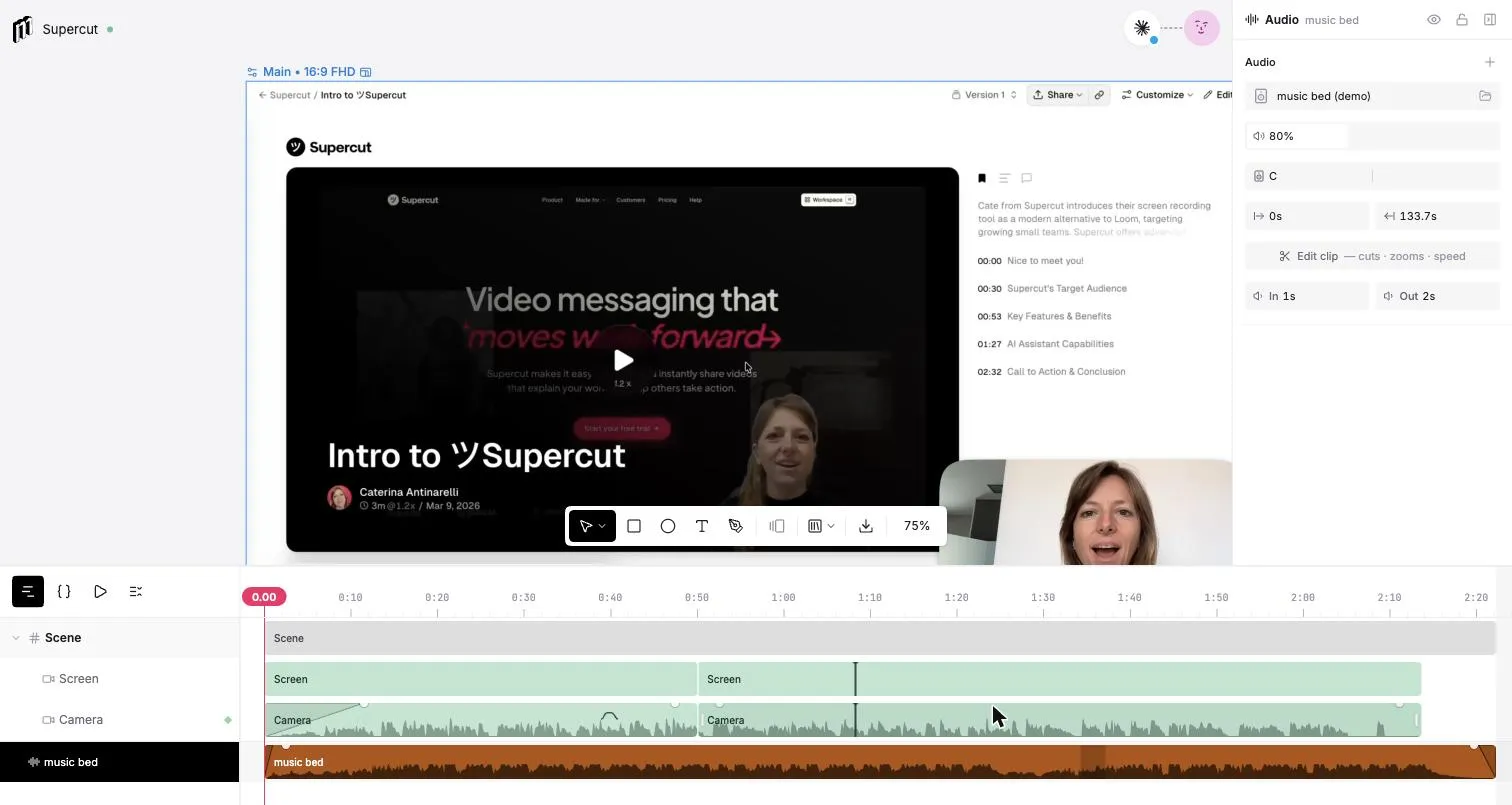
Because it’s baked from the waveform as it stands, re-cutting the voice or moving scenes around leaves the old shape behind. Run Duck under again to re-fit it, or Remove duck to clear it entirely.
The volume slider still sets the bed’s level. Ducking writes points, and points override the slider — so on a ducked clip the slider moves the whole envelope instead of fighting it. Pull the music down and the duck goes down with it, keeping the same depth underneath the voice.
Edit by transcript
Section titled “Edit by transcript”Video with a voice track gets a transcript lane beneath the waveform, so you can edit by the words that were spoken rather than hunting through the waveform. Removing a sentence in the transcript trims that moment from the clip.
The transcripts guide covers where the words come from and everything else they unlock — shared takes, and captions that follow your cuts.
Linked media stays in sync
Section titled “Linked media stays in sync”Media captured in a single take — a screen recording, a camera angle, the microphone — can be linked, so a cut or a speed-up made on any one of them lands identically on all of them and every angle stays frame-locked. That’s how a screen demo like the one above stays in sync: one cut cleans up every layer at once. The linked media guide covers how clips get linked, the same-recording suggestions, and unlinking.
Press Done to return to the timeline; your edits are applied, and the original sources are always recoverable.
Optimise — how Mixture prepares video on your machine
Section titled “Optimise — how Mixture prepares video on your machine”Open a project containing recordings that need it — or drop one in — and a small indicator appears reading Optimising source files, counting up a percentage as it works. Nothing is broken and you don’t have to wait for it; here’s what it’s doing and why the rest of this guide feels the way it does.
Most video files store a complete picture only every few seconds and describe everything in between as differences from it. That’s excellent for file size and hostile to editing: a cut placed between two of those pictures has nothing complete to start from, so it either can’t play cleanly or has to be re-rendered every time you nudge it.
So Mixture makes a one-time, editing-optimised copy of the recording — one where every frame is a complete picture, and therefore a legal cut point. That copy is what buys you:
- Cuts, speed-ups, and zooms apply in about a second — every edit after the optimisation is a near-instant repackaging, not a re-render.
- Frame-accurate and drift-free — the cut lands exactly on the frame you chose, and stays in sync with your audio.
- Playback glides across cuts — no hitching at the seams.
Some practical notes:
- It happens once per recording, in the background — it starts as soon as the project loads so it’s usually ready before your first cut, and you can keep editing (or leave the project) while it runs; the result is cached on your device for every future session.
- Everything stays on your machine. The optimisation runs entirely in your browser, on your CPU and GPU — the recording is never uploaded for it, and it works the same offline. The cached copies live in browser storage and are cleaned up automatically when superseded or when you delete the project.
- Exports always use your originals — the optimised copy is for editing and preview only; final quality is never affected.
- Recordings that are already editing-friendly (including media prepared by a connected agent following our encoding guidance) skip the step entirely.
The optimisation speed depends on your machine — roughly real-time-ish for long recordings. We’re exploring paid acceleration options (cloud-side preparation, so long recordings are ready in seconds on any device) for teams that edit a lot of long footage.